If you want to use Google NotebookLM in a practical way, the first thing to understand is not so much how to ask questions, but how to properly build your notebook. That's where everything is decided.
NotebookLM works well because it doesn't answer generically like many chatbots. Instead, it reasons about the materials you provide. Therefore, the more relevant the sources, the more useful, precise, and verifiable the answers become.
Here I show you the basic path to start from scratch: accessing the platform, creating the first notebook, uploading sources, using the chat, and managing notes.
Table of contents
- 🚀 How to access NotebookLM
- 📘 Creating your first notebook
- 📝 Renaming the notebook and understanding the screen
- 🧠 What you find in the Studio panel
- 📂 What sources you can upload
- 💬 How to ask the first question to the notebook
- ✅ Why references to sources are so useful
- 🤖 Even if you make a typo, it often understands anyway
- 🛑 What happens if you ask an off-topic question
- 📌 How to save a response in the notes
- ➕ Adding other sources to the same notebook
- 🎛️ Enabling and disabling sources
- 📚 The right method to get off to a really good start
- ❓ FAQ
🚀 How to access NotebookLM
To get started, simply open a normal browser, such as Google Chrome, Microsoft Edge, or any other program to surf the internet, and search for NotebookLM.
Once the official page is open, you can enter the workspace directly. To use the service, you must have a Google account. If you do not have one yet, you will be asked to log in with an existing account or create a new one.
NotebookLM can also be used in a free version. In the basic plan, there is a limit on the number of sources you can upload, which is already more than sufficient for many uses.
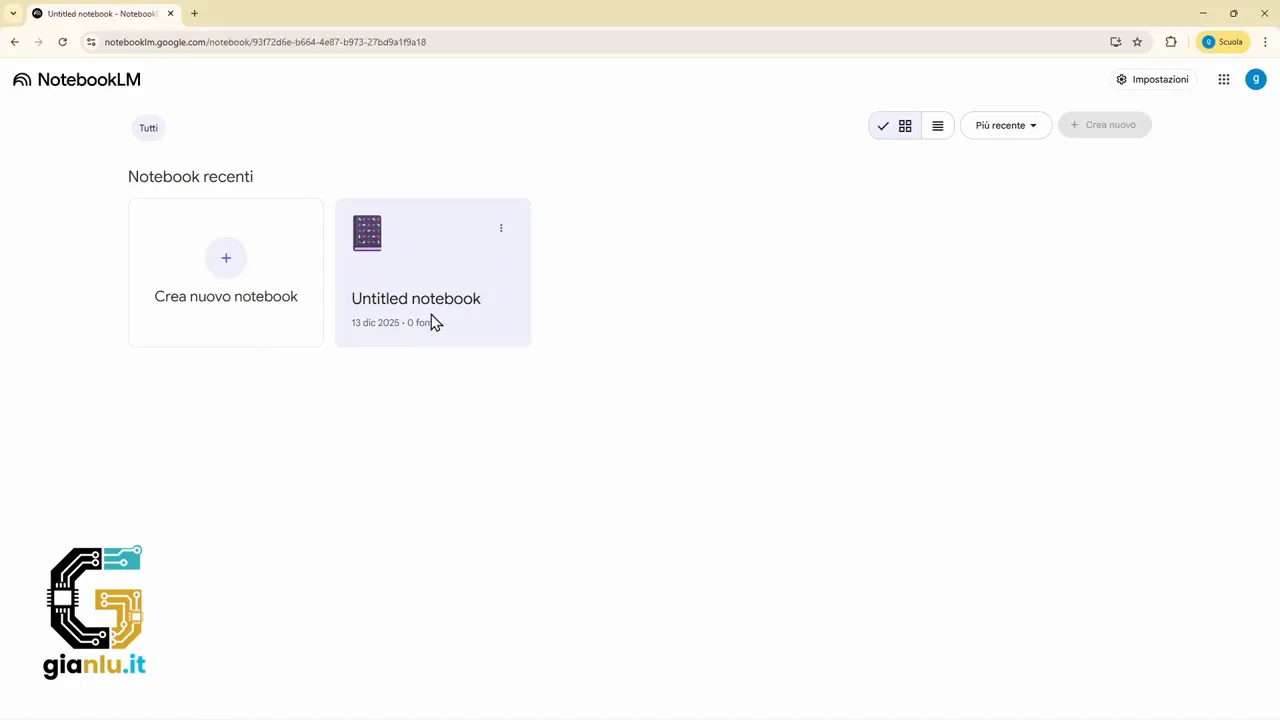
📘 Creating your first notebook
Once inside, the first step is to click on create new notebook. From that moment, NotebookLM immediately asks you one fundamental thing: which sources do you want to upload?
This is an important step, because the notebook is not born empty in a theoretical sense. It is born already connected to the materials it will work on.
Among the initial options you can:
- search for new sources on the web
- upload files from your computer
- add websites
- insert YouTube links
- retrieve documents from Google Drive
- paste copied text
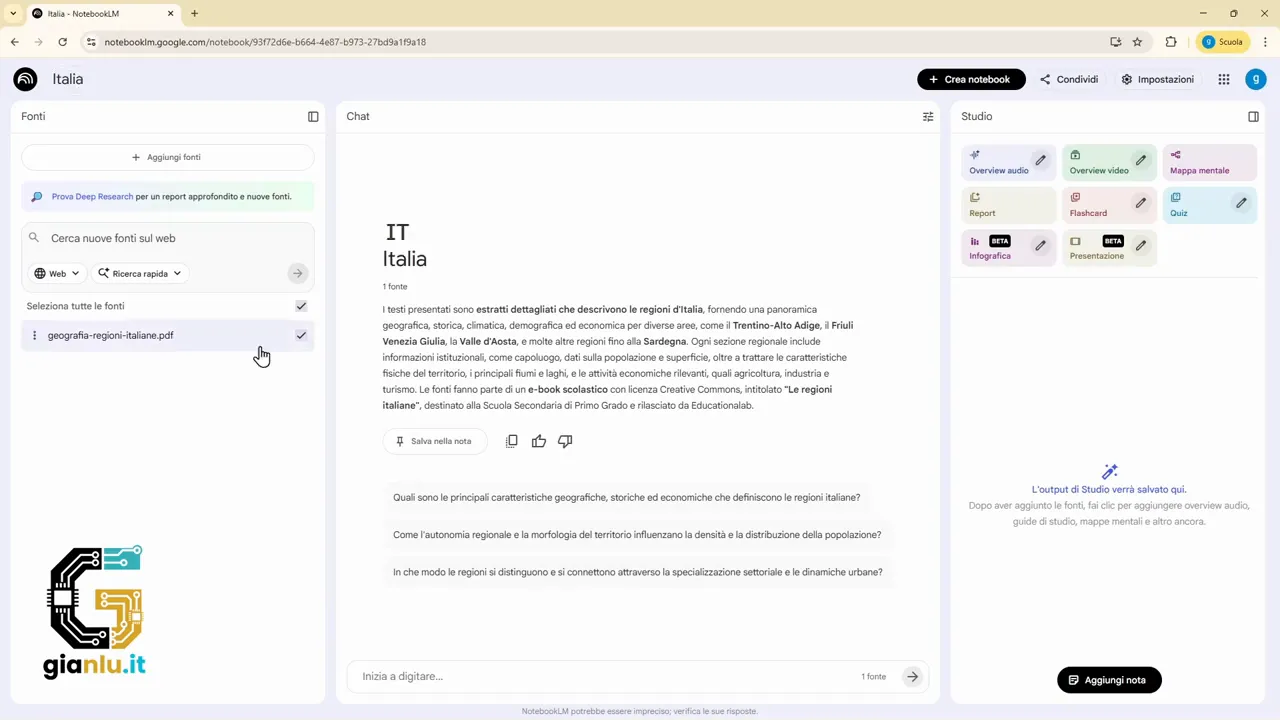
In the practical example, a PDF on Italian geography is uploaded, specifically a document dedicated to the regions of Italy. Once the file is selected, NotebookLM imports it and prepares it as the base of the notebook.
📝 Renaming the notebook and understanding the screen
After uploading, the notebook initially receives a generic name. It is best to change it immediately to a clear name, for example Italy, so it will be easier to find and distinguish from other projects.
As soon as the source is ready, NotebookLM automatically generates a brief summary of the content. This is a useful overview to check if the material has been interpreted correctly.
At this point, the screen is divided into three very clear areas:
- left column: uploaded sources
- center part: the chat to ask questions
- right column: study and content generation tools
If you click on the source on the left, you can see the text that NotebookLM has acquired from the document. In practice, you are checking the material it will reason about.
🧠 What you find in the Studio panel
On the right, there is a very interesting section often called Studio. Here, NotebookLM provides different ways to process the information contained in the sources.
Among the available tools are:
- audio overview, i.e., a spoken explanation similar to a podcast
- video overview, a video content based on the material
- mind map
- report with various settings
- flashcards with questions and answers
- quiz to test yourself
- infographic
- presentation
In this initial phase, there is no need to use them all. It is, however, useful to know that the notebook is not just for asking questions. It can become a true environment for study and content organization.
📂 What sources you can upload
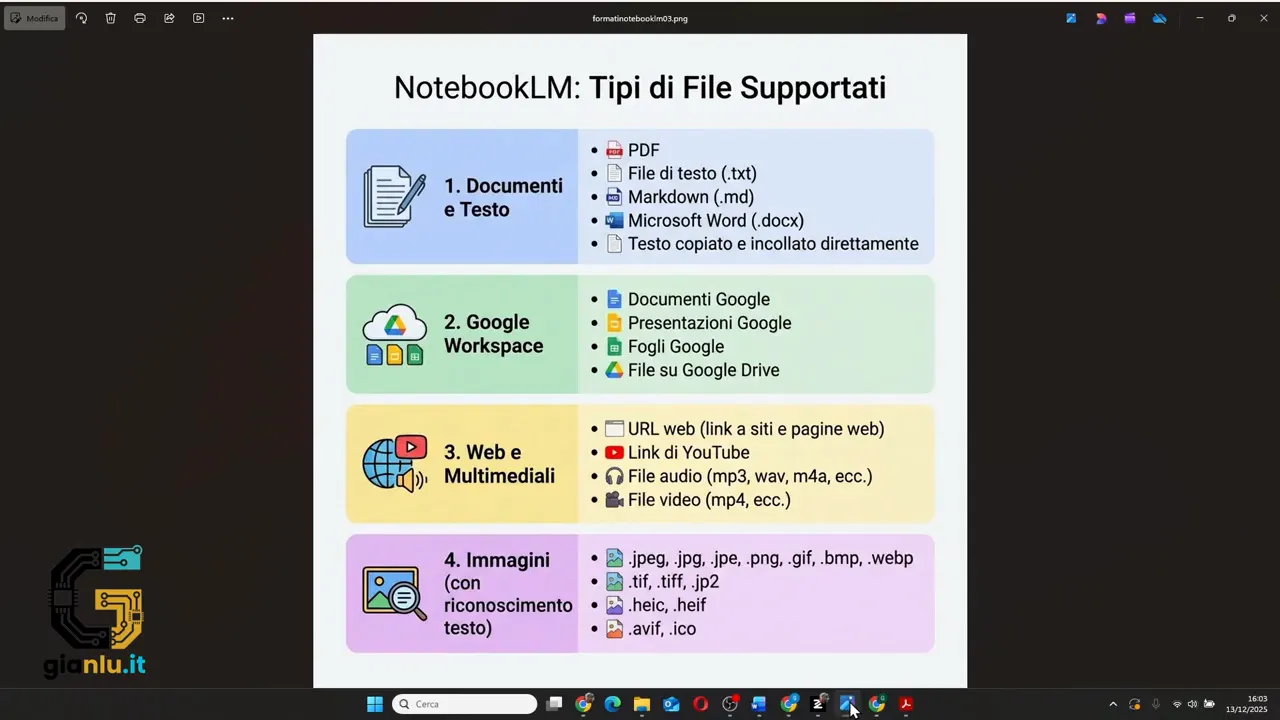
One of the most useful aspects of NotebookLM is the variety of supported formats. You are not limited to PDFs.
You can work with:
- PDF files
- file TXT TXT text files
- Markdown files
- Word DOCX documents
- copied and pasted text
Being integrated with the Google ecosystem, you can also import content from Google Drive, such as:
- Google Docs
- Google Slides
- Google Sheets
- PDFs saved in the cloud
Additionally, you can add web materials and multimedia content:
- web pages and websites
- YouTube links
- audio files, which are automatically transcribed
- video files, also automatically transcribed
- images, from which the system extracts text using optical character recognition (OCR)
This last point is very practical. If you have handwritten notes or paper documents, you can take a picture or scan them and use them as a source. NotebookLM tries to read the text in the image and turn it into searchable material.
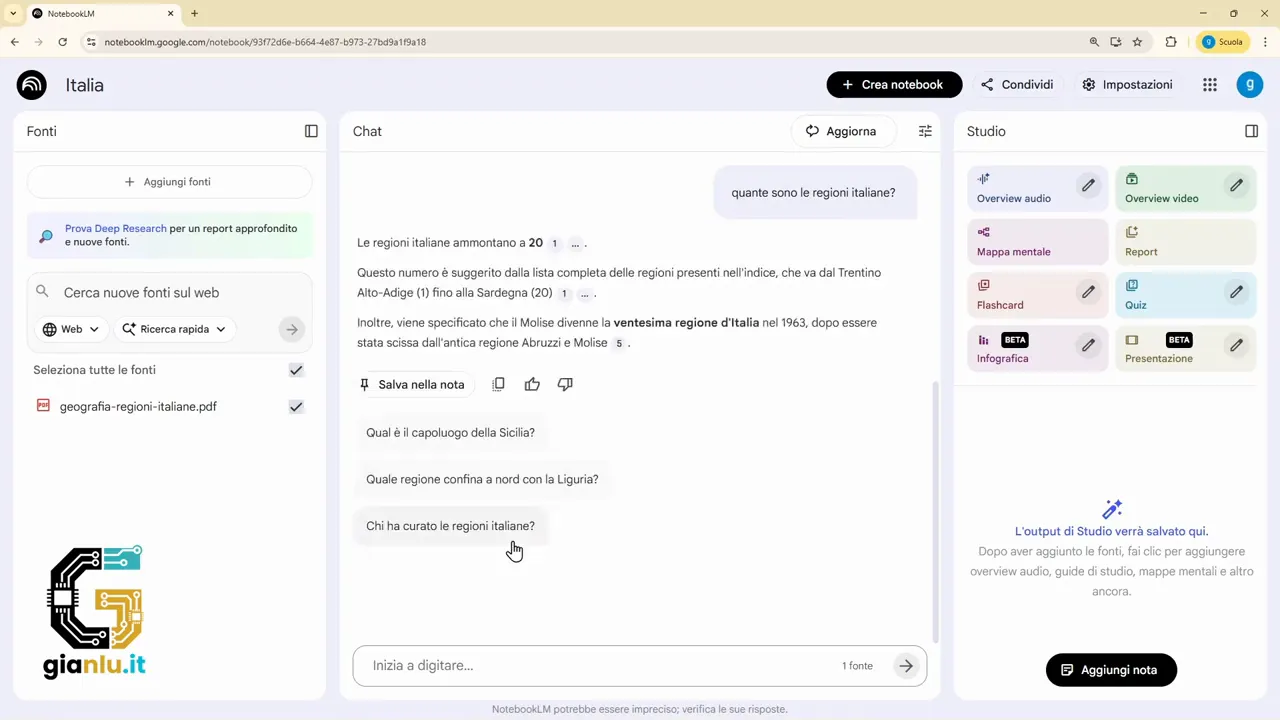
💬 How to ask the first question to the notebook
Once at least one source is uploaded, you can start using the central chat. Here, you are not talking to a generic assistant. You are querying your own material.
For example, if the notebook contains a document on Italian regions, you can ask:
- how many Italian regions there are
- list the Italian regions for me
- which is the largest region
- sort the regions by area
NotebookLM analyzes the source and builds the answer using the available content. The interesting thing is that it also shows citations from where it got the information. So you don't just get an answer, but also a clear link to the part of the document it comes from.
This makes the work much more reliable, especially when you use the system for study, research, or summarizing complex materials.
✅ Why references to sources are so useful
When NotebookLM lists information, references often appear next to the various points. Hovering over them, you can see where the system found that data.
This detail changes the user experience a lot. You are not receiving an answer from out of thin air, but an answer anchored to the uploaded materials.
If you are working on handouts, internal documents, manuals, or notes, this feature helps you to:
- quickly check the reliability of the answer
- trace back to the original passage
- reduce interpretation errors
- study in a more reasoned way
🤖 Even if you make a typo, it often understands anyway
A practical aspect that emerged during use is that NotebookLM often manages to understand even questions written with small typos.
If, for example, you mistype a word in the subject name, in most cases the system still manages to infer what you mean and proceeds with the answer.
This does not mean you should write carelessly, but it is convenient to know that you don't need to be perfect on the first try. The chat is quite tolerant of minor errors.
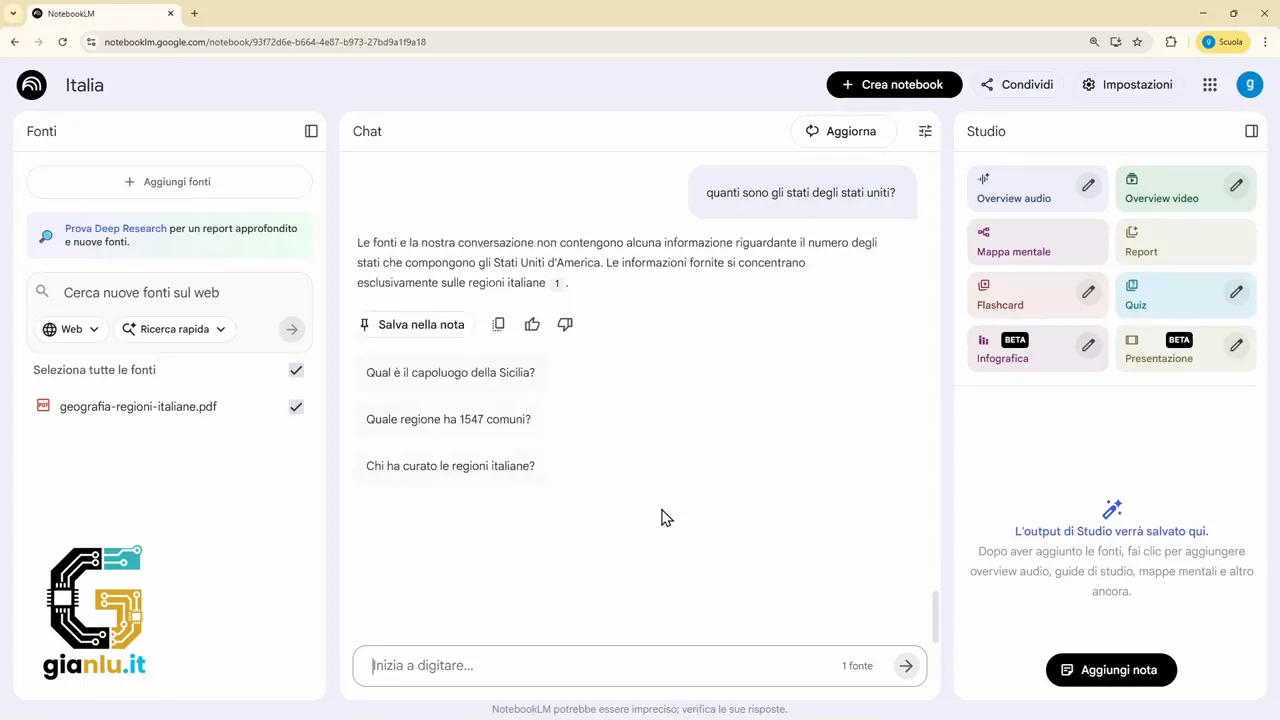
🛑 What happens if you ask an off-topic question
Here is one of the most important differences compared to a classic chatbot.
If you only uploaded a document on Italian regions to the notebook and ask, for example, how many states there are in the United States, NotebookLM does not try to improvise a generic answer.
Instead, it tells you that there is no information on that topic in the available sources.
This behavior is very positive because it reduces the so-called AI hallucinations, i.e., those invented or nonsensical answers that sometimes appear when a system wants to answer at all costs.
NotebookLM, in this sense, is more disciplined. If the information is not there, it does not force it.
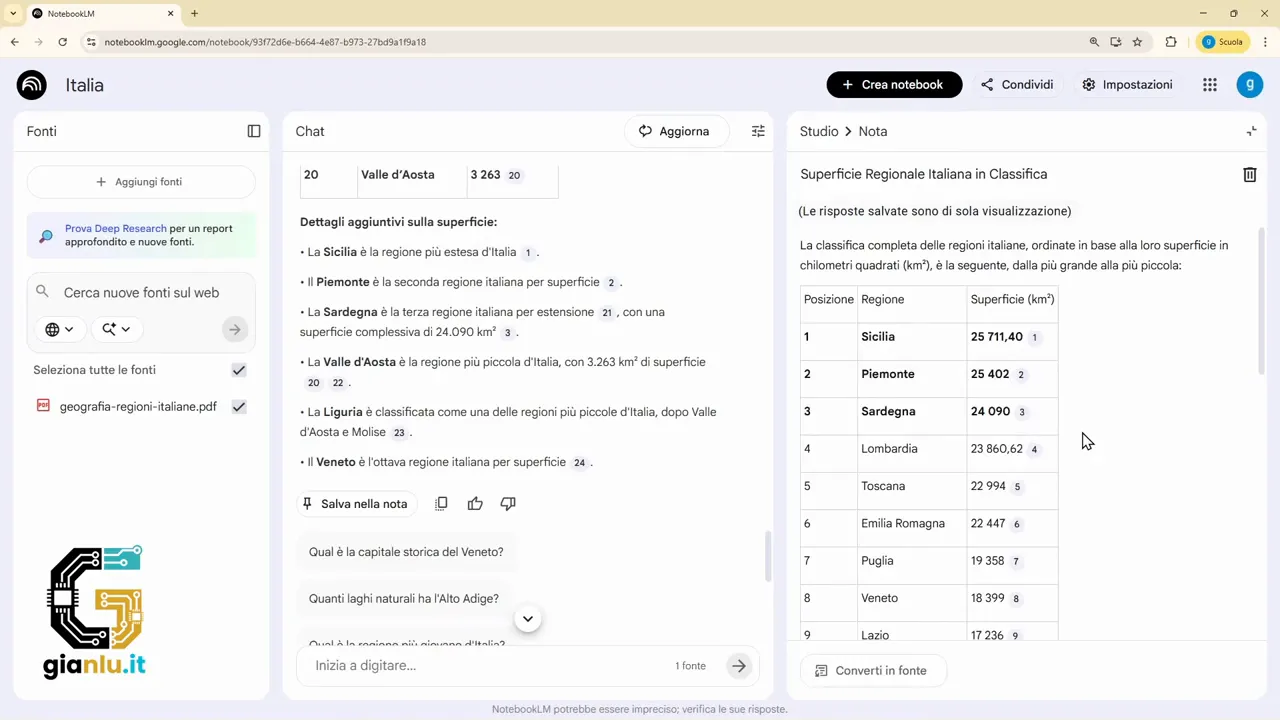
📌 How to save a response in the notes
Conversations in the chat remain available, but if you want to really keep information in an organized way, it is best to transform it into a note.
When a response is useful, you can use the save to note option. In this way, the content ends up in the side area dedicated to study.
For example, if you asked to list the Italian regions by area, you can save that result and find it later without having to ask the question again.
This feature is very useful because it transforms the chat from a simple Q&A space into an organized collection tool.
➕ Adding other sources to the same notebook
A notebook does not have to be based on a single file. You can add new sources at any time with the dedicated button.
The window that opens allows you to insert other:
- files
- websites
- Drive content
- pasted text
- and other supported formats
In the free version, you can have up to 50 sources. For normal use, this is already a significant amount. In fact, in most cases, much less is enough to work well.
The idea is not to upload everything you have, but to upload what is really consistent with the topic you want to work on.
🎛️ Enabling and disabling sources
When you have multiple materials in the same notebook, you are not forced to query them all together every time.
NotebookLM allows you to enable or disable sources. So you can decide which documents you want to base a specific question on.
This feature becomes valuable when:
- you have sources on the same topic but with a different angle
- you want to compare documents
- you want to prevent a less relevant file from influencing the answer
- you are organizing a complex project with multiple materials
In practice, you not only choose what to upload, but also which sources to make active at that moment.
📚 The right method to get off to a really good start
If I had to summarize the best way to get started with NotebookLM, I would say this:
- log in with your Google account
- create a new notebook
- upload one or more well-selected sources
- check the automatic summary generated by the system
- start asking simple and precise questions
- verify source citations
- save the answers you really need to your notes
This approach prevents you from using NotebookLM like any generic chatbot. Instead, it transforms it into a much more serious work and study tool.
❓ FAQ
Is NotebookLM free?
Yes, there is a free version. In the basic plan, you can use the service with a limit of up to 50 sources per notebook, an amount that in most cases is already more than adequate.
Do I need a Google account to use NotebookLM?
Yes. To log in and work with NotebookLM, you must log in with an existing Google account or create a new one.
What files can I upload to NotebookLM?
You can upload PDFs, TXT files, Markdown files, Word DOCX documents, pasted text, materials from Google Drive, web pages, YouTube links, audio files, video files, and images to extract text from.
Does NotebookLM also answer questions that are not in the sources?
No, and that is precisely one of its strengths. If the information is not contained in the uploaded materials, the system reports this instead of fabricating an answer.
Can I use multiple sources in the same notebook?
Yes. You can add multiple sources and also decide which ones to keep active or inactive during questions, so you have better control over the context of the answer.
What is the Studio panel used for?
It is used to transform sources into useful content to study or work better, such as audios, videos, mind maps, reports, quizzes, flashcards, infographics, and presentations.
Can I save the most useful answers?
Yes. Answers can be saved as notes, so they remain available in a dedicated area and become part of your study or work material.